

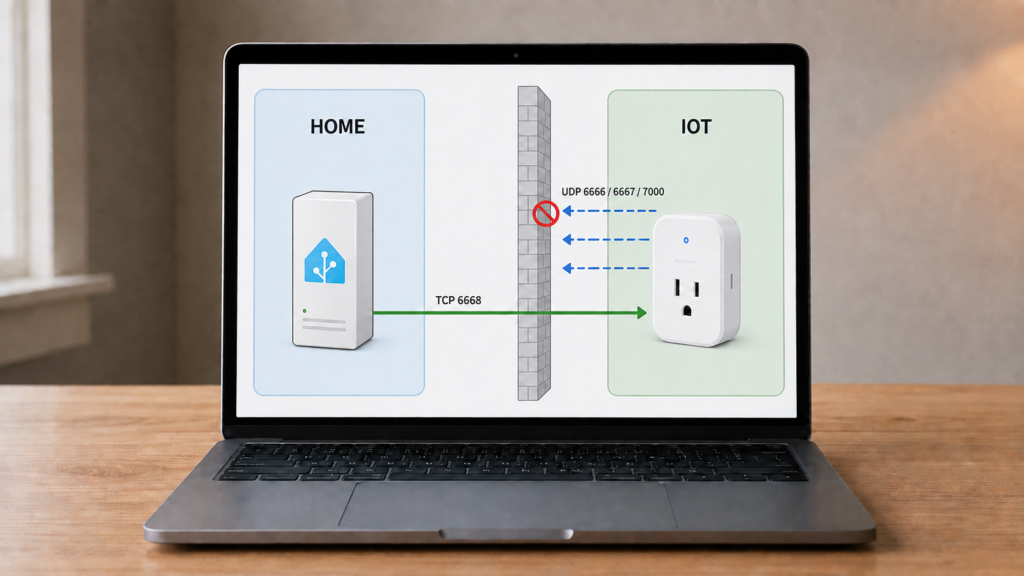
An empty LocalTuya discovery list after moving devices to an IoT VLAN usually means their local announcements are no longer reaching Home Assistant. It does not tell you whether Home Assistant can open a connection to a device at a known address. Check those two paths separately before changing firewall rules.
This guide follows our guide to blocking Tuya devices from the internet. It covers discovery, manual setup and the local control connection, using project documentation and released code. No device or firewall was tested for this article.
Discovery and control are separate
Discovery finds a device’s address and ID. Local control connects to that address with the device’s credentials and protocol. A routed VLAN can block the first while permitting the second, but moving a device does not guarantee that control will continue: routing, firewall rules, Wi-Fi isolation, the address, credentials and firmware behavior still matter.
This is about Tuya Wi-Fi/IP devices using LocalTuya or tuya-local. A Zigbee end device paired directly to Zigbee2MQTT or ZHA does not use this Tuya UDP discovery or TCP control connection. Devices remaining behind a Tuya gateway need the gateway’s connection details and the integration’s supported subdevice configuration.
rospogrigio/localtuya, its xZetsubou/hass-localtuya fork and make-all/tuya-local have different code and setup options. The original LocalTuya release checked here is v5.2.5; tuya-local is 2026.9.2-rel. Our comparison explains the repository choices. An old issue in one tracker is not proof that every fork has the same limitation.
Why discovery fails across VLANs
Tuya discovery uses UDP broadcasts, not mDNS. The original LocalTuya v5.2.5 discovery code listens on ports 6666 and 6667. TinyTuya documents discovery ports 6666, 6667 and 7000; its scanner also sends requests to 7000 to elicit announcements from certain protocol 3.5 devices. These are discovery mechanisms, not a reliable one-port-to-one-version identification rule.
Ordinary routed VLANs do not forward local limited broadcasts between subnets. Allowing a UDP port in a firewall does not turn the router into a broadcast relay. An mDNS reflector forwards a different discovery protocol and does not solve this Tuya broadcast problem.
LocalTuya #1603 describes the cross-subnet discovery limitation and notes that a cloud API’s IP field can be the home’s public address, not the device’s private LAN address. Cloud account data and a local discovery result are different things.
tuya-local’s behavior can be checked directly rather than guessed from the device protocol. Its released configuration flow retrieves account/device data, then calls TinyTuya to locate the local address. If the scan cannot find it, the address must be supplied separately. Its manual path accepts an address, device ID and local key without requiring that scan to succeed.
Control uses a direct TCP connection
Original LocalTuya’s connection code opens TCP port 6668 on the device. TinyTuya uses the same local control port. Home Assistant initiates the connection; the Tuya protocol handles the credential-dependent messages. Calling it a direct TCP connection does not mean the application payload is unencrypted.
For manual control across a VLAN, the network must route to the device and permit that TCP connection plus its return traffic. A stateful firewall normally permits replies for an allowed connection. You do not ordinarily need a separate rule allowing the device to initiate arbitrary connections back to Home Assistant.
This differs from the model-specific discovery and subnet problems in our Aqara/Xiaomi VLAN guide. Home Assistant documents cross-subnet issues for Xiaomi Miio devices, but not every Aqara hub uses Miio: a HomeKit bridge has an mDNS discovery path, while other hub/integration routes have their own requirements. A source-address rewrite used for a particular Miio device is not a universal recipe for either brand.
| Requirement | Aqara/Xiaomi integration routes | Tuya Wi-Fi local route |
|---|---|---|
| Discovery across VLANs | HomeKit discovery uses mDNS; Miio discovery and other routes need separate checks | Local broadcast discovery normally stays within a subnet; supply the device address manually |
| Control across VLANs | Miio uses UDP 54321 and can have device/subnet restrictions; other hub routes differ | Permit routed TCP 6668 and stateful replies, then verify the device’s actual behavior |
| Prerequisite | Provisioning and credentials required by that exact integration | Provisioned supported device, correct ID/key/protocol and reachable address |
No mDNS reflector or Miio-style source-address rewrite is prescribed by the Tuya connection code. That is a useful starting point, not evidence that every Tuya firmware will behave identically under isolation.
Reserve the address and add the device manually
- Provision the device normally and obtain its current device ID, local key and supported protocol. Our local-key guide covers the developer-portal route; tuya-local also offers account-assisted setup through Tuya Smart or Smart Life.
- Find the device’s current address in the router’s client/DHCP list. Reserve that address for its MAC address. A reservation keeps the configured address predictable; it does not repair a device that stops renewing its lease.
- Permit Home Assistant’s actual source address to reach the device on TCP 6668, with return traffic. Check rule order, routing and any Wi-Fi client isolation before adding the device.
- In LocalTuya, choose the manual device option in its Configure/Add device flow and enter the address, ID, key and protocol. In tuya-local, use manual setup and provide the same connection information, then select a supported device configuration. The projects’ screens and entity setup differ.
- Close other local Tuya clients and test both a command and a state update. Many devices accept only a limited number of local connections. Confirm operation again after a Home Assistant restart and a device reconnect.
A community VLAN thread reports temporarily lifting restrictions, adding devices and restoring isolation. A later reply specifically describes allowing internet access for onboarding; other replies report DHCP/reconnection problems. This is useful experience, but it does not prove that lifting a firewall relays broadcasts or that discovery was the only cause.
With credentials already obtained and the correct control rule in place, manual setup avoids depending on cross-VLAN discovery. If changing Wi-Fi required re-pairing, retrieve the new key first. Keep onboarding access distinct from the access you intend to allow during everyday use.
Docker bridge networking adds another boundary
LocalTuya #2253 reports discovery working after UDP ports were published for Home Assistant on a Docker bridge network, with no VLAN involved. It is a report from LocalTuya 5.2.3, not a general guarantee that three port mappings deliver every LAN broadcast to every container.
A container’s network interface, bind addresses, host firewall and Docker networking determine what it receives. Publishing a UDP port handles a port-forwarding path; it does not by itself extend the LAN’s broadcast domain. The original LocalTuya release listens on 6666/6667, so publishing 7000 does not add a missing listener to that release.
Home Assistant’s documented Linux Container setup uses host networking. Docker’s host-network documentation explains that published-port options are then unnecessary. Host networking still does not carry another VLAN’s broadcasts into Home Assistant. If keeping bridge networking, verify the actual packet path or use manual connection details.
TCP 6668 is the destination port on the Tuya device. It is not a Home Assistant listening port to publish merely to initiate local control from the container.
What the firewall rule needs to allow
For one known device, start with one permitted destination rather than allowing every address in the IoT subnet. The example below is policy notation, not a command for a particular router. Replace both addresses with the real Home Assistant source and device address.
allow new tcp from 192.168.1.50 to 192.168.20.25 destination port 6668
allow established return traffic for that connection
Put the allow rule where it takes effect before a broader deny. Check firewall logs for the source address actually seen, especially with containers or an existing NAT path. Add further supported devices explicitly as needed. DHCP, the Wi-Fi connection and other services used by your chosen isolation policy still need separate treatment; this rule describes the local control session only.
Check reliability before relying on isolation
A successful initial connection is not an offline endurance test. tuya-local documents devices becoming unresponsive after extended loss of cloud access and reports that DNS blocking can affect some of them. Check the exact device after a power cycle, DHCP renewal and a longer period with your intended restrictions. Change one rule at a time so you can identify which access matters.
If maintaining routes, reservations and firewall rules is unfamiliar, test a nonessential device first. A supported Zigbee device with an independent coordinator is another architecture to consider; it has its own pairing and automation migration work rather than being an interchangeable replacement for every Wi-Fi product.
FAQ
Why does LocalTuya show no devices found after moving to a VLAN?
Its local broadcast discovery may no longer reach Home Assistant. Check the container/network path, then use the device’s known address and credentials. An empty list alone does not identify a cloud-account or control failure.
Does LocalTuya need the same subnet as Home Assistant?
Local broadcast discovery ordinarily needs the same broadcast domain or a deliberately engineered relay. Manual TCP control can be routed across subnets when credentials, protocol, routing and firewall behavior are correct.
Do I need an mDNS reflector for Tuya devices on a VLAN, like Aqara/Xiaomi?
An mDNS reflector does not forward Tuya’s UDP discovery protocol. Check the actual integration route before borrowing settings from a HomeKit or Miio guide.
What ports does LocalTuya need open across VLANs?
The described manual control path uses TCP 6668 to the device and permitted replies. UDP 6666/6667/7000 concern Tuya discovery tools; which ones an integration listens to depends on its implementation. Opening them does not automatically relay broadcasts.
Can I add a Tuya device to LocalTuya manually without discovery?
Yes. Use its reachable address, device ID, current local key and supported protocol, with a stable address reservation. The key guide explains obtaining the credentials.
What the sources establish
The released connection and discovery code establish the ports and manual setup paths. The Docker and VLAN threads document particular reported outcomes, not universal fixes. No hardware test here establishes that a specific device remains reliable with cloud access blocked.
Record the integration version, firmware, address and working firewall policy. Verify commands, state updates and reconnection with the restrictions you intend to keep. That provides a useful result for your own device instead of treating discovery success as proof of complete isolation.