The Aqara T1 (WSDCGQ12LM) is a compact Zigbee sensor that reports temperature, humidity, and atmospheric pressure — entirely locally, no cloud, no Aqara account required after initial pairing. Battery-powered, it runs for up to two years on a single CR2032 cell.
This guide covers both Zigbee2MQTT and ZHA integration paths, what entities to expect, how to calibrate offsets if your readings are off, and how to put the data to work in automations and dashboards.
Disclosure: Some links in this article may be affiliate links. We may earn a small commission at no extra cost to you.
T1 vs older WSDCGQ11LM — which sensor do you have?
Aqara has shipped several similar-looking temperature/humidity sensors. Model numbers matter here:
| Model | Temperature | Humidity | Pressure | Zigbee |
|---|---|---|---|---|
| WSDCGQ11LM | ✓ | ✓ | ✗ | 3.0 |
| WSDCGQ12LM (T1) | ✓ | ✓ | ✓ | 3.0 |
The WSDCGQ11LM is the older generation. It’s still widely sold and perfectly functional for temperature and humidity. It does not have a pressure sensor.
The WSDCGQ12LM is what Aqara calls the T1. It adds a barometric pressure sensor (reads in hPa), which opens up some genuinely useful automation scenarios covered later in this guide.
Both devices pair the same way and look identical from the outside. Check the label on the back or the box. If you bought something labelled “Aqara T1 Temperature and Humidity Sensor” in recent packaging, you almost certainly have the WSDCGQ12LM.
There is also an “Aqara T1 RH” variant marketed in some regions — this likely refers to the WSDCGQ12LM, but Aqara hasn’t clearly documented whether it’s the same hardware revision or a distinct SKU. Treat that label as regional naming, not a confirmed spec difference, until you can verify the model number on the box.
Prerequisites
Before pairing, you need:
- A Zigbee coordinator attached to your Home Assistant host. Common options: Sonoff Zigbee 3.0 USB Dongle Plus (CC2652P), HUSBZB-1, or similar. CC2652P-based dongles are confirmed compatible with the WSDCGQ12LM.
- Zigbee2MQTT or ZHA running and functional. If you haven’t set up Zigbee2MQTT yet, see our guide: Getting started with Xiaomi Zigbee devices in Home Assistant via Zigbee2MQTT.
- A CR2032 battery installed in the sensor (usually included in box, may need a tab removed).
The choice between Zigbee2MQTT and ZHA matters for this specific device — Zigbee2MQTT exposes all entities including pressure cleanly; ZHA has a known inconsistency with the pressure entity that remains unresolved as of 2025. Both are covered below.
Pairing via Zigbee2MQTT (recommended)
Zigbee2MQTT is the recommended path for the WSDCGQ12LM because it exposes the full entity set reliably across versions.
Step 1: Enable permit join
In Home Assistant, open the Zigbee2MQTT integration panel and enable Permit join. Alternatively, set permit_join: true temporarily in your configuration.yaml and restart the Z2M add-on.
Step 2: Enter pairing mode on the sensor
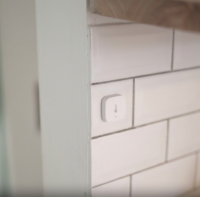
Locate the small button on the side of the sensor (may require a pin or toothpick on some units). Press and hold for approximately 5 seconds until the LED flashes three times — this resets the device and enters pairing mode.
If the device was previously paired elsewhere (e.g., the Aqara app), you may need to factory reset it first: press and hold the button for 10 seconds until the LED flashes blue several times.
Step 3: Wait for device interview
Z2M will discover the device within 30–60 seconds. Watch the Z2M log for the interview output. A successful interview looks similar to:
[2026-XX-XX] Zigbee2MQTT:info Starting interview of '0x00158d0XXXXXXXX'
[2026-XX-XX] Zigbee2MQTT:info Successfully interviewed '0x00158d0XXXXXXXX', device has successfully been paired
The device will appear in your Z2M device list as Aqara WSDCGQ12LM.
Step 4: Disable permit join
Once paired, disable permit join immediately. Leaving it open is a security risk on any Zigbee mesh.
Entities exposed in Zigbee2MQTT
After a clean interview, Z2M exposes these entities for the WSDCGQ12LM:
| Entity | Unit | Notes |
|---|---|---|
| `temperature` | °C | Reported to 0.1°C precision; spec accuracy ±0.3°C |
| `humidity` | % | Reported to 0.1% precision; spec accuracy ±3% |
| `pressure` | hPa | Barometric, absolute — see calibration note |
| `device_temperature` | °C | Internal device temperature — diagnostic |
| `battery` | % | Estimated charge level |
| `battery_voltage` | mV | Raw voltage, useful for tracking true depletion |
| `power_outage_count` | count | How many times device lost power — diagnostic |
All entities are available in Home Assistant as sensor entities under the device. No additional configuration required.
The power_outage_count entity is low-signal for most use cases but useful when diagnosing battery drain — a steadily incrementing counter on a non-USB device usually means the battery is too weak to hold a stable connection.
Pairing via ZHA
ZHA works for this device, but with one caveat: on some ZHA versions, the pressure entity is not exposed after pairing.
Pairing steps
1. In Home Assistant, go to Settings → Devices & Services → Zigbee Home Automation.
2. Click Add Device and enable joining.
3. Perform the same button sequence on the sensor (5-second press to pair).
4. ZHA will interview the device and create entities.
Known issue: missing or inaccurate pressure entity
ZHA users report several problems with the WSDCGQ12LM pressure entity, and as of 2025 these remain active issues in the HA community:
1. The pressure entity is not created at all after pairing.
2. The pressure entity is created but reads 0 hPa or a static incorrect value.
3. The pressure value appears scaled by 1/100 — a quirks bug where 936 hPa displays as 9 hPa.
Workaround if pressure is missing: The most reliable fix is to remove and re-pair the device via ZHA after a full factory reset (10-second button hold). If the entity still doesn’t appear after a second interview, the issue is a quirks gap in the ZHA device handler for this model.
Alternative workaround: Switch to Zigbee2MQTT. If pressure data matters to your use case, Z2M is the more complete integration for this device. Running Z2M alongside ZHA on the same coordinator is not supported — you’d need to migrate your other devices too, or run a second coordinator dedicated to Z2M.
If you only need temperature and humidity and don’t care about pressure, ZHA works fine with no additional configuration.
Calibration offsets in Zigbee2MQTT
Zigbee temperature and humidity sensors frequently read slightly high or low due to self-heating from the electronics or placement near a heat source. Z2M supports per-device calibration offsets for the WSDCGQ12LM.
Setting a temperature offset
In the Z2M device panel, find the device and look for the Exposes tab. You’ll see an input for temperature_calibration. Enter a positive or negative float value (e.g., -1.5 to subtract 1.5°C from every reading).
Alternatively, set it via MQTT:
Topic: zigbee2mqtt/<friendly_name>/set
Payload: {"temperature_calibration": -1.5}
Setting a humidity offset
Same approach — humidity_calibration accepts a positive or negative integer or float (e.g., 5 to add 5% if the sensor consistently reads low).
Topic: zigbee2mqtt/<friendly_name>/set
Payload: {"humidity_calibration": 5}
Setting a pressure offset
Z2M also exposes pressure_calibration for the WSDCGQ12LM. If your reading is consistently offset from a known reference, apply it the same way:
Topic: zigbee2mqtt/<friendly_name>/set
Payload: {"pressure_calibration": -2.5}
How to determine your offset
Compare the T1’s reading against a known-good reference (a calibrated thermometer or another trusted sensor placed in the same location for 30 minutes away from air vents and direct sunlight). The difference is your offset. Give it an hour after saving the calibration value before evaluating the result — Z2M applies the offset to incoming MQTT messages, not retroactively to history.
Pressure and altitude note: Absolute barometric pressure varies with altitude. The T1 reports absolute pressure. If you want to compare readings to weather forecasts (which use sea-level-adjusted pressure), you need a template sensor in HA to apply the altitude correction — Z2M’s pressure offset alone won’t account for elevation difference.
Practical automations
Humidity-triggered ventilation fan
This is the most common use case — run a bathroom or laundry fan when humidity spikes, stop it once humidity drops.
alias: "Bathroom fan on high humidity"
trigger:
  - platform: numeric_state
    entity_id: sensor.bathroom_t1_humidity
    above: 75
action:
  - service: switch.turn_on
    target:
      entity_id: switch.bathroom_fan
condition: []
mode: single
Add a second automation to turn the fan off when humidity drops below 60%, with a 10-minute delay to avoid cycling.
Temperature alert
Useful for monitoring unheated spaces (server closet, garage, wine storage):
alias: "Server closet temperature alert"
trigger:
  - platform: numeric_state
    entity_id: sensor.server_closet_t1_temperature
    above: 35
action:
  - service: notify.mobile_app_yourphone
    data:
      message: "Server closet above 35°C — check cooling."
Pressure-based weather automation
The pressure sensor enables a basic weather-change trigger. A rapid drop in pressure (>2 hPa/hour) is a reasonable proxy for an incoming weather front:
alias: "Pressure drop alert — possible rain incoming"
trigger:
  - platform: template
    value_template: >
      {{ (states('sensor.outdoor_t1_pressure') | float) <
         (state_attr('sensor.outdoor_t1_pressure', 'last_reported') | float - 2) }}
Note: this approach requires a helper or a custom template sensor that tracks the rolling 1-hour delta. A simpler approach is using the statistics integration to compute the mean over a 1-hour window and compare to current. For precise weather prediction, pair the local pressure data with a weather service — the T1’s pressure reading is most useful for confirming or triggering a locally-cached forecast rather than standalone prediction.
Dashboard setup
Three card types work well for T1 data.
Mushroom Entity Card (quick glance)
type: custom:mushroom-entity-card
entity: sensor.living_room_t1_temperature
name: Living Room
icon: mdi:thermometer
tap_action:
  action: more-info
Repeat for humidity and pressure, or use a Mushroom chips card to stack all three in a single row.
History Graph
type: history-graph
entities:
  - entity: sensor.living_room_t1_temperature
  - entity: sensor.living_room_t1_humidity
hours_to_show: 24
Useful for spotting overnight temperature swings or humidity patterns.
Gauge Card
Good for humidity at a glance with visual threshold coloring:
type: gauge
entity: sensor.living_room_t1_humidity
min: 0
max: 100
severity:
  green: 0
  yellow: 60
  red: 75
Battery life and placement tips
The WSDCGQ12LM runs on a single CR2032 coin cell. Per Aqara’s official spec, battery life is rated at up to 2 years under normal conditions. Real-world results vary — factors that shorten battery life:
- Cold environments (below 10°C) — lithium chemistry degrades in cold
- Very frequent reporting intervals (if you’ve modified the Z2M
min_rep_interval) - Poor Zigbee mesh signal forcing the device to retransmit frequently
The T1 is a Zigbee end device, not a router. It does not extend your mesh. Place it within reasonable range of a Zigbee router (a mains-powered Zigbee device) if you’re placing it in a remote room or outside. A weak signal will shorten battery life noticeably and cause delayed or missing readings.
Placement tips:
- Mount away from direct sunlight and heat sources (above radiators, on sun-facing windowsills) — these inflate temperature readings
- Avoid placing inside enclosed cabinets with poor airflow
- Wall-mounting at mid-height gives the most representative ambient reading
- Outdoors: the T1 is not weatherproofed — use a ventilated enclosure if placing on a shaded patio
Cloud and network isolation
The WSDCGQ12LM is a Zigbee device. It communicates only over the Zigbee radio protocol — there is no Wi-Fi chip, no Bluetooth, and no internet connectivity in the device itself. Once paired to Zigbee2MQTT or ZHA, it has no ability to reach Aqara’s servers or any external service.
This is a fundamental property of Zigbee end devices, not a configuration choice you make. The sensor cannot “call home” — there is no home to call.
You do not need to:
- Create an Aqara account
- Install the Aqara app
- Block the sensor at your router or firewall
- Place it on an isolated IoT VLAN (though placing your Zigbee coordinator host on an IoT VLAN is still sensible practice for limiting blast radius if the host is compromised)
If you previously paired the device to the Aqara app and are migrating to Zigbee2MQTT or ZHA, a factory reset (10-second button hold) removes the Aqara hub pairing and prepares the device for re-pairing to your coordinator.
Recommendation
For full entity support including pressure, pair via Zigbee2MQTT. ZHA works for temperature and humidity but has a reliability gap on the pressure entity — missing entities, null values, and a 1/100 scaling bug have all been reported and remain unresolved across 2025 HA releases. If you’re already on ZHA and don’t need pressure data, no migration is necessary.
The WSDCGQ12LM is a solid, inexpensive Zigbee climate sensor. The pressure reading is a genuine differentiator over the previous generation — even if you don’t build automations around it immediately, having the data in your history opens up options later. Battery life is long enough that it largely disappears into the background once deployed.
For related setup guides using the same Zigbee2MQTT workflow, see: